Choosing CI & CD Strategy (Subtitle: CodePipeline Usage)
CI & CD Strategy, CodePipeline Usage
This post has been translated from Korean to English by Gemini CLI.
This content will cover the infrastructure, implementation, and usage methods I learned while deploying within the Wooteco project. If you have any questions or opinions, please feel free to contact me at joyson5582@gmail.com or leave a comment, and I will do my best to explain.
Generally, there are various methods for code deployment. Before introducing these various methods, let’s briefly look at what CI & CD are and how they work.
CI
- Continuous Integration
- It is the process of building and testing new code changes and integrating them into existing code.
CD
- Continuous Delivery or Deploy
- Automatically deploys new code based on changed code.
This is a very clear and simple explanation. Then, what is the flow of these?
Flow
- CI operates by detecting code changes.
- If CI passes, it is integrated into the existing code, and a build is performed based on the integrated code.
- The built result is saved.
- CD operates based on the built result.
- The server operates as specified in the CD.
It can be confusing if you only look at the order, but it’s clear when you explain it in words.
Is the changed code okay? -> Integrate and build the code (CI) Has the build been successful? -> Deploy the server with the built file (CD)
All the methods below do not deviate from this framework.
Now let’s look at various methods.
CI
Docker Hub
1
2
3
4
5
6
7
8
9
10
11
12
13
14
15
# Build Gradle
      - name: Build Gradle
        run: |
          chmod +x ./gradlew
          ./gradlew test
        shell: bash

# Docker image build and push
      - name: docker build and push
        run: |
          docker login -u $ -p $
          docker build -t corea/backend:latest ./backend
          docker push corea/backend:latest
          docker push corea/backend:latest
This is steps 2 and 3 in the flow. It’s very simple.
Log in to Docker Hub -> Build an image based on the built results -> Push the image
- Advantages: If Docker is installed, the server operates as intended without needing to install other programs. (Java installation, DB installation, etc.)
Github Action + ZIP
1
2
3
4
5
6
7
8
9
10
11
12
# Build Gradle
      - name: Build Gradle
        run: |
          chmod +x ./gradlew
          ./gradlew test
        shell: bash

# Compress build files
      - name: Create deploy package
        run: |
          mkdir -p scripts
          zip -r deployment-package.zip build/libs/corea-backend.jar
This can also be called a CI process. Since the built results are compressed and saved in Github Action, it can be called steps 2 and 3.
CodeBuild
It is a build system provided by AWS infrastructure. I used this CodeBuild, and I will explain it in detail.

It builds based on the source version (branch) in the Github Repository.
- Git clone depth: Specifies how far back to receive history -> The build does not need the entire history (Commit Log). Generally, 1 is enough (is it necessary to have 5 previous commit histories within the build?)
- Git submodules: Whether to include submodules. I don’t think the rest are important right now.

This is the part that defines the computer that builds. Select the operating system and image (select the version of the image).
- With additional configuration, you can increase the computing specifications.
If you have a Docker image created for building, you can use that as well. (Image uploaded to Docker Hub)
It builds files based on the content in buildspec.yml in the source code. (Can also be managed within AWS CodeBuild)
1
2
3
4
5
6
7
8
9
10
11
12
13
14
15
16
17
18
19
20
version: 0.2

phases:
  build:
    commands:
      - echo Build Starting on `date`
      - cd backend
      - chmod +x ./gradlew
      - ./gradlew build

cache:
  paths:
    - '/root/.gradle/caches/**/*'

artifacts:
  files:
    - 'appspec.yml'
    - 'build/libs/backend-0.0.1-SNAPSHOT.jar'
    - 'scripts/**'
  base-directory: backend
Specify commands when building. (Phases also include install and pre_build, but they are not necessary right now)
Save all paths & files in root/.gradle/caches as cache -> The next build restores the cache saved in the previous build.
Include files to be built through artifacts-files. (base-directory is the base directory)
Specify where to save the files specified above. It is saved as a compressed file with the name 2024-corea/corea-backend-deployment in the 2024-artifacts bucket. (It doesn’t matter if it’s saved as a folder, but a compressed file is needed for Code Deploy later.)

It’s better to use build output logs. If you don’t upload, you can’t see the reason for the build in progress or failure.
Results

Outputs the results

Also shows reports.
CD
Self Hosted Runner
1
2
3
4
5
6
7
8
9
deploy:
    runs-on: self-hosted
    steps:
      - name: Pull Docker image from DockerHub
        run: docker pull $/$:$

      - name: Run Docker container
        run: docker run -d --name backend-application -p 8080:8080 $/corea/backend:latest
What happens if you do this? It pulls the Docker Image and executes the deployment on the server. The reason there is no explicit mention of the server is that the self-hosted runner executes the commands itself.

If you directly connect to EC2 and execute the command, the instance directly performs the Github Action.
What are the disadvantages?
- It periodically communicates to check for new tasks - Polling method
- Communicates via HTTPS, using port 443
- Since it runs itself, it can waste resources. And so on.
Most Wooteco project people used self-hosted runners because they didn’t have AWS Secret Key, so they couldn’t do it through Credentials, so they operated it this way with self-hosted runners.
In fact, in this part, Docker may seem essential, but it doesn’t matter much if you can move the built files inside EC2. (S3, etc.)
ssh-action
1
2
3
4
5
6
7
8
9
10
11
...
	uses: appleboy/ssh-action@master
	with:
	  host: $
	  username: $
	  key: $
	  port: $
	  script: |
			...
			docker run -d --name backend-application -p 8080:8080 $/corea/backend:latest
It deploys by executing the specified script through SSH connection to the server. It can be thought of as similar to a self-hosted runner, but
- ssh-action: We directly connect and execute
- self-hosted runner: The server executes itself by polling for changes
There is a difference.
Wooteco project cannot use this method because SSH connection is blocked.
As above, Docker is not important, but it is important to connect to the server and execute it directly.
AWS Credentials + S3 + Code Deploy
1
2
3
4
5
6
7
8
9
10
11
12
13
14
15
16
17
18
19
...
	- name: Configure AWS credentials
	uses: aws-actions/configure-aws-credentials@v4
	with:
	  aws-access-key-id: $
	  aws-secret-access-key: $
	  aws-secret-access-key: $
	  aws-region: $

	- name: Upload to S3
	run: |
	  aws s3 cp deployment-package.zip s3://$/deployment-package.zip

	- name: Deploy to CodeDeploy
	run: |
	  aws deploy create-deployment \
		--application-name $ \
		--deployment-group-name $ \
		--s3-location bucket=$,key=deployment-package.zip,bundleType=zip
It authenticates directly with Amazon credentials and proceeds with build upload + file-based deployment.
Wooteco project cannot be authenticated because it cannot issue Secret Key.
Code Deploy
It is a deployment system provided by AWS infrastructure. I used this just like Build, so I will explain it in detail.
In the application, you define the computing platform you want to deploy to. (EC2/On-premise, AWS Lambda, ECS) Then, create a deployment group. - At this time, you can separate it for development / operation depending on the group.

The current deployment strategy is not important, and Auto Scaling / Load Balancer are also not important. -> Just run the development server completely OK
Specify the instance through the Key value of the tag.

At this time, it asks if you want to configure the agent, which is very, very important!! I will explain why it is important after finishing the deployment creation.

When a group is created, a deployment is created. Specify the deployment group + the saved S3 file.
If the agent is not installed, EC2 cannot receive file transfers.

It generates not able to receive the lifecycle event. like this. If this error occurs, check if the Code Deploy Agent is working.
Service Operation Check
1
sudo service codedeploy-agent status
If it worked but is completely gone?
1
2
3
4
5
6
7
8
#!/usr/bin/env bash

sudo apt-get update -y
sudo apt-get install -y ruby
cd /home/ubuntu
wget https://aws-codedeploy-ap-northeast-2.s3.amazonaws.com/latest/install
chmod +x ./install
sudo ./install auto
Install it through.
Insufficient Service Operation Permissions
If you install and re-execute the deployment, but it still fails as above?
cat /var/log/aws/codedeploy-agent/codedeploy-agent.log Check the log through.
1
2
InstanceAgent::Plugins::CodeDeployPlugin::CommandPoller: Missing credentials
- please check if this instance was started with an IAM instance profile
If this log appears, check if the EC2 IAM has permission to perform CodeDeploy. -> If it doesn’t work even after granting permission?
1
sudo service codedeploy-agent restart
Restart and check again.

If it succeeds like this, it’s done.
1
2
3
4
5
6
7
8
9
10
11
12
13
14
15
16
17
18
19
20
21
22
23
24
25
26
27
28
version: 0.0
os: linux
files:
  - source: /build/libs
    destination: /home/ubuntu/build

  - source: /scripts
    destination: /home/ubuntu/scripts

  - source: appspec.yml
    destination: /home/ubuntu/build


permissions:
  - object: /
    pattern: "**"
    owner: ubuntu

hooks:
  ApplicationStart:
    - location: scripts/deploy.sh
      timeout: 60
      runas: ubuntu

  ValidateService:
    - location: scripts/healthCheck.sh
      timeout: 30
      runas: ubuntu
Similar to CodeBuild, it deploys the server based on the content in appspec.yml.
Specify where to save the files, grant permissions to the files, and specify the scripts to be executed for each hook.
At this time, we need to install Java directly on EC2.
1
2
3
4
5
6
7
8
9
10
11
12
13
14
15
16
17
18
19
1. Install Java
wget https://download.oracle.com/java/17/archive/jdk-17.0.11_linux-aarch64_bin.tar.gz -O /tmp/openjdk-17_linux-x64_bin.tar.gz

2. Decompress
sudo tar xfvz /tmp/openjdk-17_linux-x64_bin.tar.gz --directory /usr/lib/jvm

3. Delete Java compressed file

rm -f /tmp/openjdk-17_linux-x64_bin.tar.gz

sudo update-alternatives --install /usr/bin/java java /usr/lib/jvm/jdk-17.0.11/bin/java 100

4. Java settings
sudo update-alternatives --set java /usr/lib/jvm/jdk-17.0.11/bin/java

5. Java environment variable settings

export JAVA_HOME=/usr/lib/jvm/jdk-17.0.11
export PATH=$PATH:/usr/lib/jvm/jdk-17.0.11/bin
If you open the server on 8080?
1
sudo iptables -t nat -A PREROUTING -p tcp --dport 80 -j REDIRECT --to-port 8080
Let’s also do IP port forwarding.
Thus, the deployment using CodeDeploy is complete.
Code Pipeline
Code Pipeline combines CodeBuild and CodeDeploy, and it is an infrastructure that enables truly zero-downtime deployment.
Pipeline Settings

If waiting, if code commits continue, deployments proceed in order. (1.0.0 -> 1.0.1) Additionally, in the advanced settings below, you can specify an existing bucket in the artifact store. (Automatically creates a bucket if it’s the default location)
Source Stage

Github notifies AWS CodePipeline of its changes via WebHook. -> The pipeline operates based on this.
Build Stage

Generated builds can be reused.
Deploy Stage

Deployment & deployment groups can also be reused.

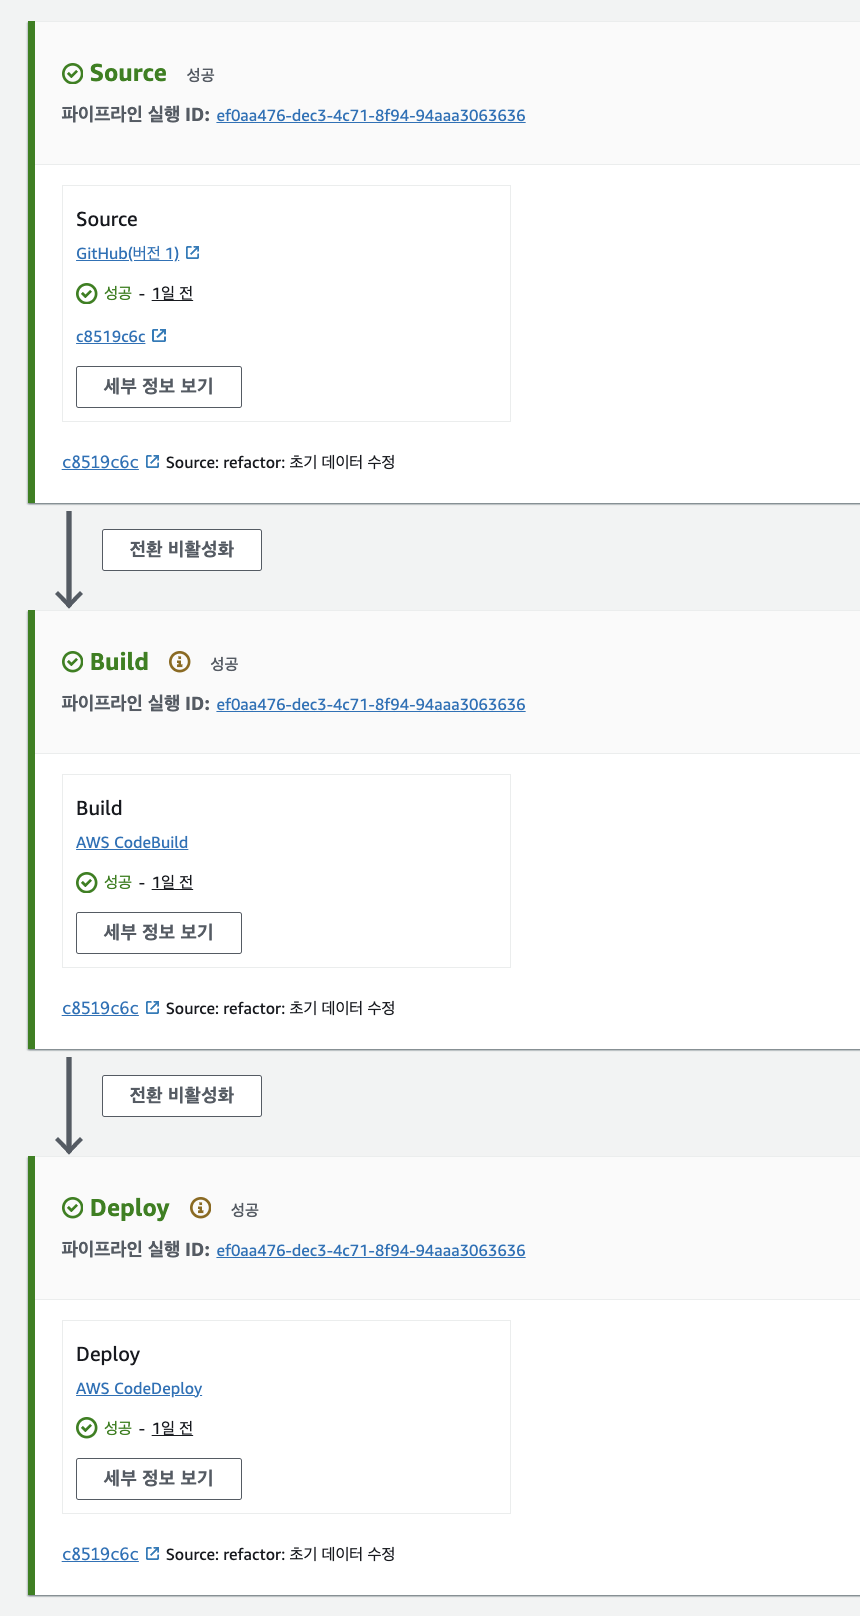
At this time, if you look at the details,
Source outputs SourceArtifact -> Build inputs SourceArtifact -> BuildArtifact Deploy inputs BuildArtifact and ends with deployment.
If you go into the bucket at this time?

It creates folders + Build/SourceArtifact itself like this. (Inside, there are also source artifacts and built results.)
=> As a result, when we push the source to Github, deployment is automatically performed. (Not dependent on Github Action)
Conclusion
There will be countless other CI and CD methods.
- Can it be applied to your team?
- Does it matter if it depends on AWS infrastructure?
- How to manage built results
- How convenient it is to deploy to the server (load balancing, auto scaling, blue-green strategy)
I think it’s good to establish a CI/CD that suits each team by considering these things.
Our team decided to use CodePipeline, which is completely dependent on AWS, because we don’t have an AWS SecretKey but need to use AWS infrastructure + don’t want to use Self-Hosted Runner.
At this time, to check if the deployment was successful/failed or to go directly to the deployed address, it is possible through AWS Chatbot or AWS CloudWatch + AWS Lambda + Slack Webhook. We plan to introduce this gradually.
And, CI-CD does not necessarily have to be connected as one.
If I decide that I don’t need to use CodeBuild, it is also possible to build directly in Github Action and transfer files.
Even if CodeBuild is used, it might be okay to run it directly with the built file without using CodeDeploy.
Because even if a build is successful, it may not necessarily need to be deployed automatically.
https://github.com/woowacourse-teams/2024-corea This project has been introduced. Once again, comments are always welcome as this article contains insufficient knowledge.
References
https://jojoldu.tistory.com/282 https://github.com/jaeyeonling/reaction-game/tree/main